Table of Contents
A practical Irish guide explaining flooring transition strips, where they are needed, and how FBS Flooring helps homeowners choose safer, cleaner floor finishes.
Quick answer
Where one floor runs into another, little edge pieces keep things smooth. These bits sit right at entrances, linking separate surfaces without a gap. When tiles shift to wood, something must bridge the space neatly. Uneven levels get fixed by these low ridges that blend the step. Floating planks move slightly – these guards hold the line steady. Stairs often have them nearby, just where floors join up. Wet spots like porches rely on them to block damp creep. Older Irish houses use them underfoot when foundations sag or settle. Extensions built later tie in better thanks to hidden joins. Even flats with thin bases find strength along those edges. Daily traffic beats down corners; trim shields take the hit.
Key takeaways
Where one floor meets another, small metal or wood pieces slide into place. These bits guard against cracks forming near doorways. Edges stay safe when floors shift slightly over time.
Where one floor type meets another, they smooth the transition. Laminate links neatly to engineered wood through their design. Parquet edges line up cleanly beside vinyl surfaces. Carpet ends meet tile without gaps thanks to their shape. Each connection fits tight, no matter the materials involved.
Where one floor sits higher than another, reducer strips bridge the gap. These pieces slide between surfaces to create a smooth transition. When levels differ slightly, they fit right in. Their job? Making uneven spots easier to walk across. Step by step, they balance the change underfoot.
Hard floor transitions at matching heights often work well with T-bars.
These small pieces between rooms tie floor changes together neatly.
Edge strips on stairs make each step clearer while shielding surfaces underneath. A subtle guard that keeps materials intact over time. With them, wear focuses elsewhere instead of corners where feet land most.
Most Irish houses face moisture issues, thanks to aging base layers beneath floors. Entry points demand attention when old sections meet new builds across rooms. Different floor types connect unevenly without smart layout choices. Moisture sneaks in where past renovations ignored drainage needs.
A wobbly edge might lead to trouble down the line. Rough spots catch fingers more than they should. A crooked cut changes how things fit together later on.
FBS Flooring walks alongside folks in Ireland, guiding choices on floors, padding beneath, edge finishes, along with how it all fits together during setup.
What are flooring transition strips?
Where two floors come together, that’s where these trim pieces do their job. Sitting right at the doorway, they bridge spaces without drawing attention. Between living room and kitchen, they keep things smooth. At stair edges, they prevent trips quietly. Near sliding doors, they handle shifts in height. Around entryway mats, they stay flat underfoot. Where old flooring connects to new, they blend the join invisibly.
Called different names depending on where they’re used – door bars, threshold strips, or maybe reducers. Shape changes the label, sometimes they’re known as T-bars or cover strips. Floor trims slip into place just like transition profiles do. Purpose plays a role too in what people decide to call them.
Most folks overlook what a solid transition piece actually handles. Edge protection comes first, stopping your floor from chipping at the seam. Without it, movement in floating installations gets restricted, which causes buckling later. Tripping hazards fade when heights align smoothly across surfaces. A clean visual wrap-up happens naturally, not forced by trim or patchwork fixes. Function drives form here, nothing decorative about it.
Floors shift slightly over time, so gaps at edges help them breathe. Instead of cracking, materials like wood or vinyl stay intact when given space. At door openings, a smooth transition keeps things level underfoot. Uneven spots between rooms become safer with a gentle slope. Trim along the sides guards against dents and moisture damage. Where two surfaces meet, a tidy line makes all the difference. Sudden changes in height fade into view with the right profile. Gaps hide where one room ends and another begins neatly. Materials push outward now and then – room to move prevents warping. Finished entrances feel intentional, not roughed in last minute. Edges that are covered last longer with daily wear. Joining distinct flooring types works best with a steady link. Subtle shifts beat abrupt drops near hallways or thresholds. Protection comes from fit, not force, behind every seam. Clean lines appear naturally when transitions get attention
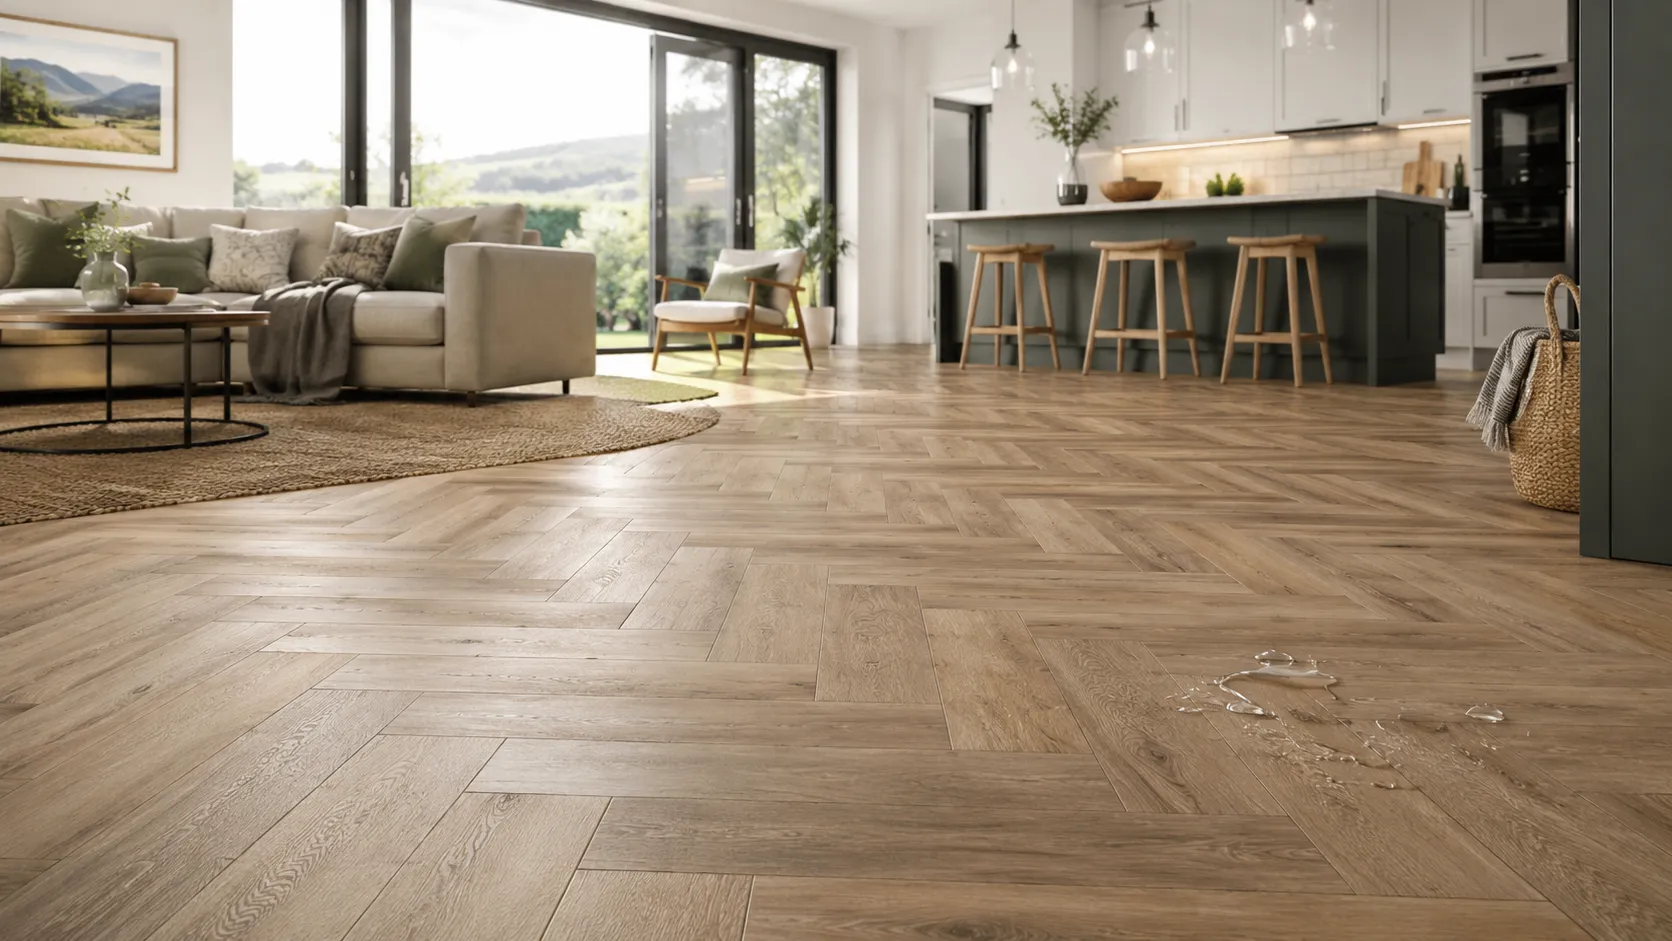
A step between floor types fits right where tile meets wood. Picture a narrow piece bridging the gap at an entrance. One side lines up with ceramic, the other touches hardwood. The strip sits flat, joining two textures without gaps. It handles slight height differences smoothly. This part keeps things safe underfoot. No tripping, just steady movement across zones. Made to last, it resists daily wear. Seen best when unnoticed – doing its job quietly.
A step between floor types makes movement smoother. Where one surface ends, another begins without gaps. This piece keeps edges aligned and steady underfoot. Tripping risks drop when materials join neatly. Floors of differing heights link securely through its design. It bridges changes while looking unobtrusive. Stability meets simplicity at every threshold.
Start at the edge where floors meet. Pick your trim piece when you pick your flooring, not later. Think about padding underneath plus how rooms connect. Subfloor type matters just as much as fit. Installation style changes everything too. FBS talks through each detail ahead of time. That way one space flows right into the next without surprise.
At wet or moisture-prone rooms
Where people enter, water often follows. Floors meet walls at spots that demand attention. A kitchen’s edge handles spills differently than a hallway’s border sees scuffs. Material choice ties closely to what happens nearby. Damp areas ask for resistance. Dry zones allow simpler solutions. Type of foot traffic shifts what works underfoot. Matching the barrier to the surface matters just as much as location. Every room sets its own rules by how it lives.
A bit of metal or plastic at the floor edge won’t stop water sneaking through walls. Leaks keep happening even if you fit one, especially when airflow is low or the ground stays soggy. Still, picking the correct shape might shield corners from chipping. A snug fit could also mark a clearer line where wet zones meet dry ones.
For related reading:
At external thresholds
Starting at the bottom, entrance and patio doors demand more attention than most. Rain finds its way under thresholds, so gaps matter a lot. Draughts slip through tiny spaces, especially when floor levels shift unexpectedly. Water tracking becomes an issue if the design ignores daily wear. Mats pile up dirt but also trap moisture if not planned for. Door clearance changes depending on what lies beneath. Floor height differences can surprise anyone during installation. Access needs room to move, literally.
Most homes need a way in that’s both safe and easy to reach, according to Ireland’s rules on building access. Moving between floor levels? That shift matters just as much as the front door. Even if there is a small ramp at entry, meeting standards isn’t automatic. What counts is how well someone can get inside without struggle. Floor transitions play a role too – overlooked sometimes, yet part of the bigger picture. Guidelines say thinking ahead about movement helps make spaces usable for more people.
Types of flooring transition strips explained
Strip shape works best when matching flat surfaces. T-bar lines up right at the join between similar materials like wood or laminate, hiding small gaps where floors meet. When levels shift slightly, reducer fits smoothly across steps down – common near doors into bathrooms or basements. At spots where flooring ends, such as by glass doors or fireplaces, end caps guard raw edges from wear and tear. Threshold pieces sit under indoor doors, marking space shifts without tripping hazards – fit depends on how high the floor sits. Trim that meets carpet keeps fibers locked in place along stair landings or closet openings. On stairs, nosing wraps around each front edge, shielding corners most prone to chipping over time. Beading tucks beside baseboards, bridging tiny spaces left after installation finishes off walls. Hard-traffic zones prefer metal strips – they resist dents yet might clash with softer decors. Solid wood thresholds blend into upscale rooms but react if humidity swings too wide. Flexible vinyl profiles handle uneven joins well, especially where sheet meets plank styles. Low ramps help avoid sudden drops where entries slope gently inside homes.
T-bar or T-moulding
A small space between floor levels helps the T-bar fit just right. Sitting on top, it hides the seam yet leaves room underneath for shifting.
Starts clean between matching floors – think laminate meeting itself or engineered wood joining like material. Where doorways cut through identical surfaces, this slips right into place instead of leaving gaps behind.
A close look at floor transitions shows T-bars tend to work well when levels match. Instead of building up a slope, they simply bridge the space between surfaces. This keeps things smooth underfoot while hiding small gaps effectively.
Reducer strip
One level sits above another? That’s when a reducer comes into play. Downward shifts in height get handled through either an incline or tiered change.
Where tiles run into laminate, that’s when it comes in handy. Uneven carpet beside engineered wood? It handles that too. When an old space connects to a newer flooring layer, things shift – this helps smooth the change.
Start strong by picking a reducer if your floor levels shift. This bit slips right where heights differ, smoothing each step. Edge protection comes next – no gaps left bare. A ramp-style cover does the job when changes are small. Floors stay safe, tripping risks drop. Finish flat without fuss, just clean lines across spaces.
Last detail on the edge or finishing piece
A strip of trim wraps up edges when flooring meets something else. Think about using one next to a glass door that slides open, maybe near brickwork that sticks out, a built-in closet, sunken rug holder, or stone base around fire. Edge pieces give closure where surfaces collide.
That bit of coverage keeps the raw side hidden, so the flooring doesn’t seem incomplete. Edge stays shielded, appearance stays clean – no jagged ends showing through.
Door threshold strip
Underneath the doorway, a slim piece fits snug between spaces. This divider handles shifts from one floor type to another without fuss.
Between hallways and bathrooms, you often find it in Irish houses. Kitchens connect to living rooms this way too. Bedrooms link up with landings sometimes. Apartments reach toward entrance doors like this as well.
Carpet to hard floor trim
Most times, carpet edges demand their own kind of border – nothing like what laminate or wood uses. Where carpet meets tile or hardwood, a special transition piece holds the fabric down, keeping things smooth at the join. The fit stays clean because that strip is made just for shifting between soft and solid floors.
A loose fit could slip right out of place here. That rigid floor trim just won’t keep the carpet steady.
Stair nosing
Edge trim on stairs does more than just cover seams. This piece guards against wear where feet land most. A clean look follows naturally when corners get tidy treatment. Finishing steps well changes how the whole flight feels underfoot.
Falling can happen on steps, so having an expert install them makes sense.
Metal strips
From front doors to shop floors, aluminium holds up well when lots of people pass through. Hallways often get fitted with it because it handles bumps without showing marks. Brass look-alikes bring warmth but still resist wear over time. Where shine matters, chrome styles catch the light while staying tough. Stainless finishes act strong against scratches in places like offices. Rentals tend to pick these since they survive moving furniture and daily use. Busy homes choose them not for looks alone, but because they last longer than most expect.
Even tough, their shade should match the floor, baseboards, knobs inside, how things look together. Though built to last, hue matters alongside walls, trim, fixtures, room mood. Strong stuff, yet tint needs harmony with floors, edges, pulls, decor flow.
Timber and wood-effect strips
Wooden or wood-like planks mix easily with laminated surfaces, real timber, composite flooring, plus parquet styles. A softer look comes through when compared to steel.
Moisture-heavy areas demand extra attention during setup. Considering how the material expands comes first – then matching hues, picking a suitable surface texture, factoring foot movement through spaces follows close behind.
Flexible or vinyl profiles
Bent edges flow better under certain planks – think thin vinyl or bendy LVT. Where corners turn softly, these trims slip right in. Kitchens with tight layouts often hide them well. Utility spaces use the low rise too. Even tiny flats find room without fuss.
Before anything else, make sure it works with the floor setup.
Ramp and accessibility profiles
Where steps must exist, gentle slopes offer easier passage. These transitions assist those using strollers or mobility devices, along with anyone carrying weight or moving slowly.
A qualified expert should check thresholds in spaces where access matters. Relying on a cosmetic trim won’t confirm it meets requirements.
What kind of transition strip works where? A room-to-room breakdown
Hallway to living room
Laminate might meet another laminate here. Engineered wood could connect with a laminated surface nearby. Parquet often finds its way into hallways underfoot.
Height alignment? Go for a T-bar. Mismatched sizes? A reducer handles that instead.
A crowded passage puts stress on low-cost moldings. Over time, they start to come loose.
Start with the doorway when picking floor materials. That spot handles more steps than most. Match it right with a sturdy transition piece. Heavy use means both pieces must work as one. Think about how they meet each time someone walks through. A mismatch shows fast under pressure. Smooth shifts matter where shoes drag across entryways.
Suggested products:
Kitchen to dining room
Tile next to engineered wood might work well. Vinyl beside laminate shows contrast without clashing. LVT paired with parquet brings texture into play.
Go with a reducer if it fits. Where dampness shows up, pick a threshold strip made for wet areas instead.
Water sneaks into gaps when floors meet walls. Cleaning spills creep under baseboards slowly. Uneven surfaces trap dampness near edges. Height changes between rooms invite leaks. Moisture waits where tiles stop and wood begins.
Related FBS guide:
Bathroom to hallway
One mix might be vinyl turning into laminate. Sometimes tile shifts toward engineered wood instead. Another path? Tile moving under carpet layers slowly.
Go with a moisture-safe threshold strip instead of a reducer. That choice handles damp conditions better.
Most concern comes when water moves into the space, making bare edges grow larger.
Start strong by picking a bathroom threshold made for damp spots – keeps water away from weak edges. A good fit means less risk where floors meet walls. Instead of holding moisture in, it lets things breathe. This kind stays put without feeding mold or rot. Right material matters more than looks here. Protection begins at the bottom line. Floors last longer when details like this get attention.
Bedroom to landing
Starts with carpet shifting into laminate, sometimes swapping for engineered wood instead. Laminate might meet more laminate, a common switch but less surprising. Carpet stepping into engineered options happens often too. Each change fits different floors below.
Best option: Carpet-to-hard-floor trim or T-bar.
Bumpy floor corners tend to lift at the sides. Rattling fittings often pop loose when driven over rough spots.
From the utility space into the cooking area
Starts with vinyl meeting tile at the edge. Then vinyl shifts into laminate nearby. Tile edges up against wood somewhere else.
Go for the long-lasting edge that handles damp conditions well.
Most concern comes from washing things – water, machines, constant everyday wear. Each task adds up over time without warning.
Apartment entrance
Matching mats work best with laminate floors. Hallway surfaces connect smoothly at shared thresholds. Engineered wood pairs naturally near entry rugs.
Start strong. A stop end works well here. Or maybe a reducing fitting instead. Metal edging could do the job too.
Watch out for how much space the door needs. Acoustic underlay has specific requirements. Moisture at entry points can cause issues.
Related FBS guide:
Office or commercial unit
Start with carpet tiles, then shift into vinyl underfoot. Laminate flows next to sturdy entrance matting nearby. A wood-like floor finishes at ceramic tile edges.
Go metal if you can. A ramp works well too. Commercial-grade shapes hold up longer.
Most danger comes from busy roads, legal responsibility issues, along with falling debris.
Related FBS products and articles
Why flooring transition strips matter in Irish homes
Most Irish houses look nothing alike. Picture a flat in Dublin – then swap it for an old-style home, or maybe a beachside getaway. Think of something fresh in the suburbs, then change again to a countryside cottage fixed up years later. Each one shifts in its own way, depending on what came before.
Some older Irish houses come with bouncy wooden floors, chilly concrete bases, leftover tiles, or mismatched floor heights underneath. Where an extension connects to the main building, it usually links through a doorway or a shift into open space. In flats, you might need extra thought about sound barriers beneath flooring, how doors swing, and what the building administration allows.
Wetness shows up in odd corners. Rain tracks in through entryways, carried on boots that leave behind mud along with wet soles. Water jumps out during kitchen chores, bathroom scrubbing, laundry routines – each space handles its own splash patterns. Houses near the sea? They wrestle foggy air plus invisible salt drifting inside.
A shift in flooring material won’t mask deeper flaws. When floors feel wet, springy, broken, lopsided, or chilly, check what lies beneath first. Installation waits until the base proves sound.
Most homes lose nearly one tenth of warmth right through the floor. What works for insulation relies heavily on how the floor was built and how much mess people will accept. Height shifts matter more than expected during renovations across Ireland. Adjustments like extra layers beneath flooring demand careful step and doorway checks. Finished levels rise quietly but meaningfully with each added material. Planning ahead avoids awkward gaps or tight clearances later. SEAI tracks these details closely in upgrade guidance
Useful FBS guides:
A wooden floor meets tile under a doorway’s edge. This gap filler sits where rooms change below coats hung by the door. One step moves from soft grain to smooth stone near rain boots lined up sideways. The metal ridge bridges surfaces at the house’s front sweep. Flooring shifts beside a basket holding keys above a worn mat.
Slipping happens when paths are uneven. Ramps help people move without trouble. Floors that tilt can lead to falls
One wrong step near the edge might snag your shoe. Floors that shift slightly make walking feel off. Metal bits sticking up tend to poke or hurt bare feet. Trims not fixed right slide when stepped on. Badly chosen joins cause trouble for strollers, walkers, couches, kids, chairs. A lovely surface turns annoying fast if details fail.
Out here, where shops operate, tenants rotate, or kids rush through hallways, it really counts. Matching the step shift, floor surface, and how much walking happens shapes whether the strip works.
When it comes to steps, pick a real stair nose instead of a regular door trim. Steps require specific edging made just for them, along with precise installation.
Start by bringing in someone trained – like an installer or builder – to check the step height if your project involves access needs. Where it applies, think about Ireland’s access rules. Just adding a floor edge strip won’t make things meet standards.
How to choose the right flooring transition strip
Use this checklist before buying:
Identify both flooring types.
Start by checking how high the completed floor sits across each side. Then compare those two points carefully.
Check whether the floor is floating, glued or nailed.
Check what space the maker says to leave open.
Consider moisture exposure.
Choose a shade that lines up, finish included.
Every day, vehicles move through streets in constant flow.
Check door swing and clearance.
Pick how you’ll fix it right. Go with what works best here.
When doubt creeps in, reach out to someone trained. A question might come easier after talking it through with an expert.
Before you buy a transition strip, check:
Floor type on both sides
Finished floor height
Expansion gap
Door swing
Door clearance
Subfloor condition
Moisture risk
Underlay thickness
Colour match
Traffic level
Installer recommendation
FBS Flooring guides people through matching floors and trim pieces, particularly where rooms connect but sit at uneven levels.
Common mistakes to avoid
Most people pick just because of how it looks. Yet that shade might seem fine at first, yet crumble when placed where it must work. What stands out on display often fades once tested against real gaps.
Avoid these common errors:
Using a flat strip when the floors are different heights.
Ignoring expansion gaps on floating floors.
Securing items on a floating floor without allowing shifts. Movement stopped by careful placement across the surface. Anchored so adjustments stay minimal during use. Stability reached when parts fit tight but not rigid. Each piece held firm through balanced pressure points.
Spending less on decorative pieces where people walk through often.
Leaving sharp or exposed edges.
Hiding damp or uneven subfloor problems.
Forgetting door clearance.
Paint went on wrong, shade not right at all.
Using unsuitable trims near bathrooms or utility rooms.
Every limit seen in exactly the same way.
Installing stair nosing without proper knowledge.
Buying flooring first and trims later without checking compatibility.
A cheap-looking seam might ruin how a high-end floor appears, leaving things feeling incomplete. When bad, such strips lead to chipped corners, shifting boards, creaking sounds, even stumbling hazards.
Installation options self setup or expert help?
A few basic door trims work fine when handled by someone who takes their time at home. Still, picking the right transition pieces often depends on experience you usually get from doing it before.
Start by sizing up the opening. Pick a suitable profile after that. A small space for swelling must be left behind. Trim the piece so it fits just right. Mount the foundation part firmly in place. See if the door still swings free. Finish by inspecting how both sides meet.
Could you do it yourself? Maybe, when door frames match height. Yet pros often suggest help even then. A gap reducer works if floor levels differ slightly. Usually okay – provided fastening matches both surfaces. Stairs need edge protection. Most people should skip handling that part alone. Experts nearly always say install it right. Thresholds in busy spaces get heavy use. Hardly ever a DIY choice. Professionals agree they belong in commercial areas. Bath entrances face wet conditions. Often worth professional input. Water resistance matters too much to guess. Laying floors across several rooms brings complications. Better left to experienced hands. Planning expansion space affects outcome strongly. Floors built on uneven base layers pose trouble. Never simple. Fix the foundation before anything else.
Flooring decisions flow smoothly when every piece fits – FBS handles selections, padding, edges, transitions, installation, making sure each space links naturally to the next. What ties it together isn’t just material but how each part connects where rooms meet.
Relevant links:
Materials and finishes
Aluminium
Out in the open, aluminium holds up well. Hallways see it often, also places rented out by others. Busy entrances choose this material, offices too notice its usefulness.
Brass-effect
Floor details in a brass-like finish bring cozy tones, fitting well within classic spaces. These work nicely alongside parquet patterns, herringbone layouts, or rich-toned wooden surfaces. Style leans into heritage looks without feeling outdated. The metallic hint softens deep stains and textured grains.
Chrome or stainless steel-effect
Smooth surfaces fit right into today’s living areas, offices, also floors with a crisp, icy base.
Timber
Wooden door bottoms often match well with man-made or solid timber floors. Picking the right one matters since changes in humidity affect how wood behaves.
Veneered or wood-effect profiles
Wooden fasteners work well with laminate, engineered wood, or parquet shades. Softer in appearance compared to metal ones.
PVC or vinyl profiles
Out in the open, PVC trims fit spaces like utility closets or small flats just fine. When floors roll into curves – or click alongside LVT – vinyl steps in smoothly. What works depends on what it meets along the way.
Firm strips made of elastic material alongside business-shaped parts
Where doors get lots of use, thick rubber parts hold up best. Buildings like offices or stations often pick these strong seals. Tough materials handle crowds without wearing down fast.
Busy spots handle metal edges well. Where laminate meets flooring, fake-wood strips often look more natural. Toughness comes from metal. Matching happens easier with styles that mimic real timber.
Cost Guide for Ireland
Price shifts a lot between different transition strips. What you pay ties closely to what it’s made of, how long it needs to be, the shape along the edge, surface look, who makes it, how tricky installation gets, if doors need cutting, prep underfoot, plus any stairs in the path.
Aluminium basics handle basic doorways without fuss. A touch cheaper, built to last daily bumps. Metal strips show up where floors meet inside spaces. Price shifts when shiny finishes come into play. Matching laminate means blending floor tones closely. Sits mid-range, keeps visuals smooth across rooms. Real wood edging suits high-end timber layouts. Fitting takes time, mistakes stand out fast. Nose edges guard stair treads and flat platforms. Spends more cash just to keep feet safe. Heavy-duty profiles fit storefronts or office entries. Taller builds manage slopes plus constant stepping.
Start by getting a full estimate from FBS Flooring – include the flooring, padding, edges, and setup in one request. This way, picking a nice-looking floor won’t later run into surprises at the door frames.
Maintenance and replacement
Every now and then, take a look at transition strips. Loose screws might show up, so keep an eye out. Movement can happen over time – notice if things feel shaky. Adhesive may stop holding, especially in high-traffic spots. Edges that lift are another sign something is off. Any cracks or dents mean it’s time to act.
Start by wiping surfaces using cleaners made for that specific finish. Timber accents shouldn’t stay wet – keep moisture away. Water near the sides of laminated or composite planks? That spells trouble. When a strip shows wear, swap it out fast, or the base layer beneath might start to fail.
Maybe it’s not the strip at all when it lifts again and again. Could be the floor shifting more than expected. An unlevel base underneath often causes trouble like this. Sometimes the glue just does not hold right on that type of material. Or perhaps the shape of the trim was a poor match from the start.
Decision tree: choosing the right transition strip
Start here:
Do both levels stand at equal height?
True, a T-bar might work just fine – or maybe go for a regular threshold strip instead.
Wrong. Try something like a taper or gradual drop instead.
Could it be that just half has carpet?
Yes: use a carpet-to-hard-floor trim.
Could be near where steps drop off.
True, installing stair edging matters – proper placement by a skilled worker makes sense. A careful setup ensures balance while stepping up or down.
Might there be dampness close by?
Right. Pick fabric that handles damp well while looking at how edges are shielded.
Could this be a boundary set from outside?
Check the water supply first. Near that spot, look at how people reach it. Airflow might be an issue – watch for unwanted currents. Door space matters when opening wide. Building rules often point the way forward.
Does the floor seem to hover?
True – keep that space safe so things can shift freely. Movement stays smooth when nothing blocks the way.
How FBS Flooring helps you get the transition details right
Flooring choices in Ireland get handled differently by FBS. Instead of focusing on appearance alone, they look at the whole setup first. The kind of floor matters – so does what goes beneath it. Underlay and subfloor conditions shape how things turn out later. Room dimensions play a role, along with doorway space when fitting new floors. Gaps for movement need planning ahead of time. Finishing edges and joining pieces between areas come into view too.
Picture this: one space flows into another, each asking for something different. The living area might call for engineered wood, while the hall demands something tougher – like laminate. Kitchens bring their own challenge, needing floors that resist moisture. Stairs? They’re a whole separate piece, built with grip and safety in mind.
Helpful FBS links:
How this guide was prepared
From real-life choices made in Irish houses and workplaces, this guide shapes up how floors get picked and laid down. Picture shared floor types meeting at doorways, needing space to shift without cracking. Think about what hides underneath – damp basements, tiled entries, uneven bases – all part of the setup. Some spaces face wet feet daily, others welcome rolling wheels or shaky steps. Each material talks to its neighbour differently, so fit matters just as much as feel underfoot.
Start by looking up the fitting details that come with your selected flooring – laminate, engineered timber, vinyl, parquet, or trim. Where people enter often, take time to go through Technical Guidance Document M from Irish Building Regulations; bring in an expert if things are unclear. When laying floors involving insulation layers, follow SEAI advice since how you construct the base impacts warmth retention and final height of the surface.
FAQ
What is a flooring transition strip?
Where one floor ends and another begins, a little piece of trim steps in. This bit hides uneven spaces along the edge. Smooth shifts happen when surfaces change level slightly. Protection comes quietly at every seam. Rooms connect more neatly because of it. Door openings often hold these strips without notice. Near stair landings, they do their job out of sight. Different types of flooring join better this way. Entry areas benefit just as much. Appearance gets sharper but never shouts about it.
Do I always need a transition strip between rooms?
Most times it’s needed, though not every case. When materials shift – like tile to wood – a connector helps. Height differences matter too; gaps can trip anyone. Floating floors often demand them, since they move slightly over time. Doorways look neater when sealed properly at the edge. The person fitting the floor must review how the space sits plus what the brand says first.
Which trim fits where tile meets flooring that clicks together?
Depends on height difference across the floor line.
Most times, tile stands taller than laminate flooring. That means a reducer strip helps smooth the change. When heights match up, something like a T-bar could do just fine instead. Check how much space the laminate needs to move first thing every time. Fitting anything too tight risks damage later on.
A T-bar splits flow into two directions at right angles
Meanwhile, a reducer joins pipes of different sizes by tapering one end. One shapes direction. The other adjusts diameter. Neither does what the other handles.
From up top, a T-bar spans across when levels match closely. Where one surface sits higher than another, a reducer steps down gently instead. Above the break, the T-bar fits flush like a lid. Uneven ground shifts better under a reducer’s slope. Matching elevations let the T-bar sit flat without strain. When floors differ, the reducer bridges without sharp edges. Overhead coverage defines how the T-bar functions best. Gradual change is what the reducer handles by design.
Can transition strips stop floor movement?
Even when installed, transition strips won’t freeze floor motion. Instead, they hide gaps caused by shifting and shield edge damage. Floors that float must have room to grow or shrink freely. Too much motion? Likely culprits include uneven subfloors, dampness, shoddy setup, or unsuitable padding underneath.
Are transition strips needed for floating floors?
Most times, that’s right. Walls, door openings, and shifts between rooms usually leave space around floating floors. That open edge stays hidden under a connecting piece, which still lets the surface shift slightly. Since every brand sets its own rules, check what the maker says before setting anything down.
Maybe that strip works both places
Depends what kind of edge each floor needs. One size does not always fit every gap. Check how thick the materials are together. Sometimes it fits. Other times a different piece is better. Matching height matters most.
Most times it won’t work. The way carpet edges are held matters – soft materials demand careful securing. Hard surfaces like wood or laminate? They rely on trims that guard against chipping while letting planks shift slightly. Transition pieces made just for carpet meeting tile or hardwood tend to handle this best.
For a bathroom door opening, which threshold works most reliably?
Water levels between rooms matter when picking a step-over piece at the door. Because heights might differ, something low but strong works better most times. Instead of just blocking dampness, it needs space to let wetness escape too. Matching color and material keeps things looking whole across spaces. FBS picks fit based on what floor you’ve got down already.
Wood might suit some floors. Metal handles heavy traffic well.
Each material fits different needs. Choice depends on use, not which is best.
Busy spots tend to handle metal strips better over time. Instead of cold steel, wooden options bring a softer touch that matches real wood floors nicely. Wherever you’re putting them – laminate, tile, or old parquet – the decision shifts based on footfall and dampness indoors. Style matters too, along with what’s already underfoot.
Can transition strips reduce trip hazards?
Most issues start with poor choices at installation time. One step up might need just a gentle slope instead of a sudden edge. Still, even low changes demand careful parts selection. If something wobbles or sticks out, it becomes dangerous fast. Getting rid of jagged or shifting strips lowers risk right away.
Why does my transition strip keep coming loose?
Wrong type of trim could be part of the problem. Or maybe the glue isn’t holding well. Loose nails might let it rise up easily. Floors that shift slightly can pull strips loose too. Dampness sneaking in often weakens adhesion over time. An unlevel base underneath creates gaps slowly. Heavy use wears down edges faster than expected. When it lifts again, resist the urge to swap it out right away. Take a close look at how the floor sits beneath first.
Matching Trims with FBS Flooring?
Flooring choices matter more than people think. FBS guides Irish buyers without pushing one option over another. Picking the right base layer comes next, since floors behave differently where feet get wet. Kitchens, bathrooms, hallways – each throws a new challenge at floor coverings. Uneven levels between spaces need careful bridging too. Trim pieces step in once main sections are down. Height gaps hide better when transitions fit just right.
Underfloor warmth below – do those slim connectors handle the heat just fine?
Yes, most fit without trouble when installed right.
Most times it works – just make sure the floor layer, padding, glue, and build match what the heat setup needs. Heat moving through the ground might shift things or clash with certain materials. Go straight to the maker’s guide first, then reach out to FBS Flooring for clarity prior to placing any order
Matching transition strips to the floor often blends better
Sometimes hardware on doors catches attention first. A different choice might link spaces quietly. Tone matters more than rules here. Eye follows color shifts across rooms. Metal finishes can echo elsewhere nearby. Balance shows up in small decisions like this one.
One option might suit better. Though both are possible, a plank that looks like timber often fits right into the floor’s flow, whereas metallic tones – brass-like, shiny silver, or dark steel – tend to echo knobs and fixtures already there. Most houses across Ireland find it works well when you start by looking at the ground surface, only after that comparing what metals show up around the space.
Can I install a transition strip myself?
A basic door trim at uniform height might work if you take your time and know what you’re doing. Where floor levels change, though, things get trickier – think steps, bathroom entries, or spots that slope. When water shows up, or gaps appear, better leave it to someone who does this regularly. Uneven surfaces especially demand steady hands and proper tools.
Is your subfloor actually causing trouble?
That might be what’s going on.
When the strip lifts repeatedly, that bounce underfoot might point below. Changing gaps? Swollen edges? Height jumps like that often trace back to what’s underneath. Homeowners looking into fresh floors get clear steps from FBS Flooring on what lies beneath matters. Checking it first makes a difference most overlook.
Final advice
Where floors meet, a tiny strip often holds everything together. Not just hiding gaps, it keeps edges safe while guiding your step between spaces. Smooth moves matter, so does how materials join without clashing. Little detail, big role in making rooms feel whole.
Start by thinking about doorways when picking floors for multiple rooms. Instead of waiting, get in touch with FBS Flooring early. They can line up the right floor, padding, edges, and connectors ahead of time. That way, each opening feels smooth, secure, and put together just right